How to Navigate Your WordPress Dashboard
Welcome back, friends! Now that you have found the perfect theme for your website it’s time to learn how to navigate your dashboard. If you are new to WordPress than it may be confusing and overwhelming not knowing where to find the things that you need, which is why I am going to walk you through the basics so that you are more comfortable when you are in there.
How to Navigate Your WordPress Dashboard
Everyone’s dashboard may look a little different depending on what themes and plugins have been installed. Here is a screenshot so you can get a general idea of what it will look like.
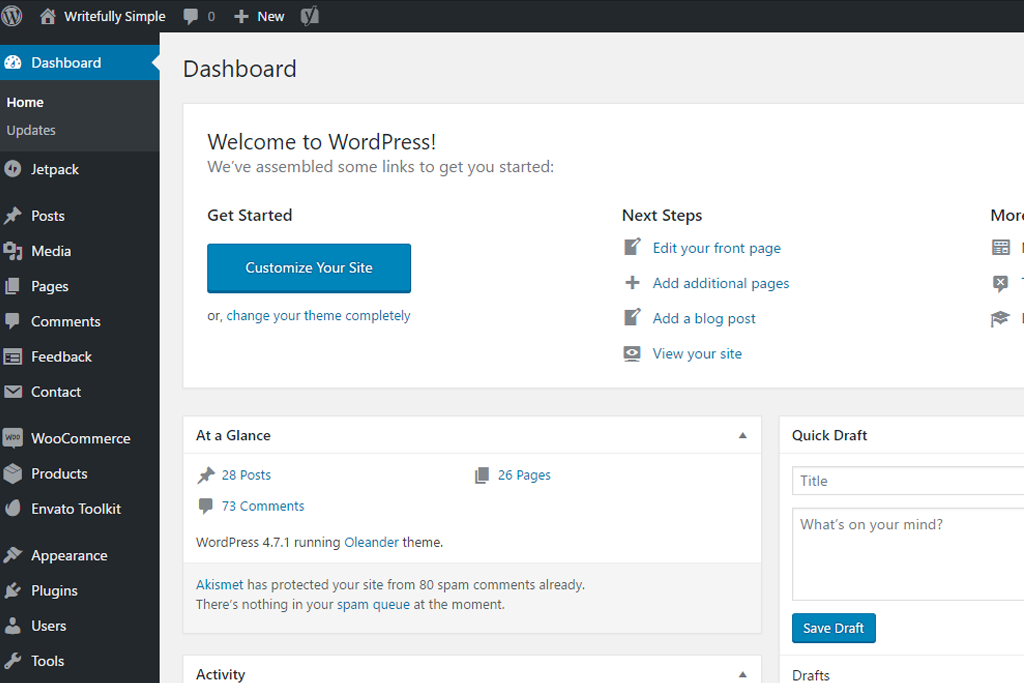
The main page of the dashboard will show many of the things that you will need quick access to, while the left sidebar contains the other things you will need to access to, such as pages, posts, appearance, settings, etc. You can customize what is shown on the main dashboard page using the “screen options” drop-down in the top right corner of your screen.
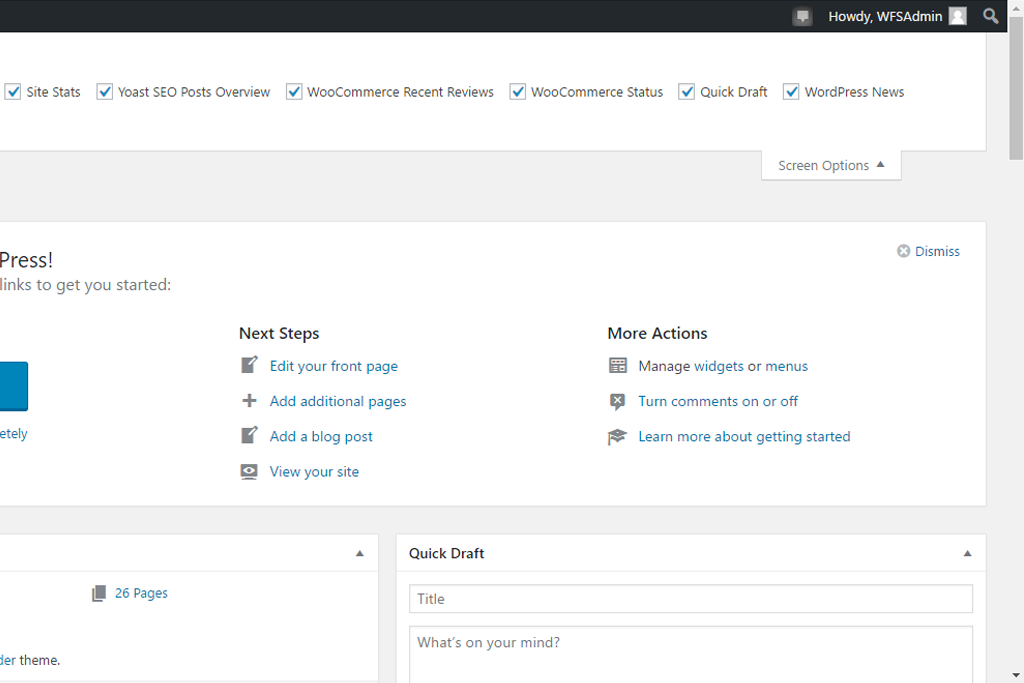
When you start to add plugins to your website (which we will cover in the next post) you will have the ability to add certain views or settings onto the main dashboard page, such as Jetpack, Google Analytics, and Yoast SEO. It’s so convenient to be able to see all of your stats and other important information in one place instead of having to go to multiple websites in order to see the same information.
First, let’s work with your website’s user and main settings. All of these are found on the left-hand side of your dashboard.
Users
If you need to have multiple users with various login permissions, this is where you can add new users or edit your own profile.
Tools
Tools contain options to perform some non-routine management tasks. As a beginner, you probably will not need to use this option but be sure to hop in there and at least get yourself familiar with what is in there.
Settings
Your settings options may look different from the above, depending on the plugins that you have installed. You should at the very least have general, writing, reading, discussion, media, and permalinks.
General settings is where you can edit your site title, tagline, URL, contact email address, time zone, and the date and time format.
Writing is where you can edit your default categories and blog formats.
Discussion settings is where you can edit the settings for comments.
Reading is where you can edit what the front page displays as, either with your latest posts or as a static page. You can also choose where your posts page will show up, how many blog posts are shown, and how much of each blog article you want to be shown. You can also customize the message that readers will be shown when they follow your blog or a certain post.
Discussion is where you can edit the articles, comments, and avatar settings.
Media is where you can determine the maximum dimensions (in pixels) to use when an image is added to the Media Library.
Permalinks is where you can customize the URL structure for your blog posts.
Some other things that you may find in settings are from various plugins that you may have, such as Sharing for social media if you are using Jetpack.
Now that you have the very basic settings in place, it is time to start building your site with pages, posts, adding media and adding in some customization. If you have not already, be sure to brainstorm what you need to include in your website and gather other pertinent information, such as contact information, social media URLs, and the different pages and the content to include. If you need more guidance on this before you really dig into the dashboard be to check out my Create a Website From Scratch post.
Okay, fast forward and let’s just assume that you have all the information that you need in order to get your website going. I should point out, even if you have an outline of your website you can always add and adjust things as you are working on your website.
Pages and Posts
These pretty much work the same way, as far as setting up but are two different things. A page is static and is not listed by date, they do not use tags or categories. A few examples of a page includes the home page, about, services, testimonials, contact, etc. A post, on the other hand, are entries listed in reverse chronological order on the blog/post page that you selected to use as your post page when you were in your settings tab.
To start a new page or post, click New at the top of your dashboard. It will open a new window where you can create your page or post. There are two small tabs on the top right-hand corner of your editor, one says Visual and other Text. You will mainly use the visual tab, but if you need to add in any HTML, you will need to switch to the text tab.
Once you are done typing up the content and adding in the media you want to include, go to the top right-hand side and you’ll see Publish. If you creating a post you are able to schedule it by clicking on Edit next to publish immediately and change the date and/or time you want the post to publish. If you have installed Jetpack you can also edit the settings to share your post on different social media platforms, along with the excerpt.
If you scroll down you can assign Categories and Tags to your post on the right side of your screen. To edit existing categories or tags, hover over posts and you’ll see a drop-down with tags and categories. You can create new ones here, or within your post editor.
You can also assign a Featured Image for blog posts, or if your theme needs it for various features such as featured pages. If you set a featured image, the image that you use is what your RSS feed and some social media platforms will pull.
If you are needing to find a list of all of your pages and posts you will want to navigate to the left-hand side of your dashboard. You will see Pages and Posts listed towards the top. If you click on either of these you will be able to see a corresponding list of each. In the Post section you will also be able to see all posts that are scheduled, and any pending drafts that you have previously created.
Media
Your media library is where you will find any of your photos, videos, PDFs all in one location. If you are just starting out, your library will be empty. You can easily add media in bulk by clicking on Upload Media and you can either drag files into the media box or you can select which by going through your normal file upload process. This is also how you will find any media URLs for an image you had previously uploaded.
Appearance
Appearance is probably one of my favorite parts of the dashboard because this is where you can start to really customize your website. There are so many neat features within this tab. You can change your theme, change your navigation and other menus, customize your widgets, install plugins, and access your CSS.
Customize is the place you will want to go to add in your logo, favicon, site title, change your colors, page and post settings, add widgets, and more. The difference between this and other ways is that the customize menu will only have things that are defaulted to the theme. This will prevent you from having to go in and change the coding itself. For many people, it will have most of the options that they need to access easily. Another neat feature of this menu is when you make changes you will see the updates occur. Be sure to save the changes though, otherwise, everything you just customized will go back to the theme default options.
Widgets allow you to add content, images and different features within your theme. Most widgets are created for the sidebar areas, but they can also be used in the header, footer, sidebar, below content, and basically any other area within your theme. The available widget areas that you have in your theme will vary from theme to theme.
Menus will be created after you have created pages for your website. After going into Menu, you can begin to create a menu. On the left side, you will see a section that says Pages. Here you are able to view the most recent pages that you have created, all of the pages, or you can do a search for certain pages. You can also add in categories, which will bring up a list of the posts that you tagged with those specific categories, or add in a custom link too.
Select the items you want to add to your menu, and hit the Add to Menu button and they will appear in the Menu Structure section. Once they are there, you can drag and drop the menu items around where you want them to be. In other words, you can rearrange the order, or even create sub-menu items by moving them around. Once you have them in the proper place, add a name to your menu and then hit save.
Once you create a menu hit the Manage Location tab at the top and select where you want the menu to show up, such as the main navigation, footer, etc.
Plugins are the building blocks of your WordPress website. The right ones can add features, improve functionality, increase security, and boost speed. There is such an abundance of plugins that are available that the number of choices can become overwhelming.
In order to view your plugins, simply go to the Plugins tab. There you’ll be able to see all of your plugins, both active and inactive. To add a new plugin, click the Add New button on the sidebar or next to the Plugin page title. You’ll be shown six plugins by default and you can search for other plugins using the search bar. Once you find one you want to install, you just press Install Now and then Activate. Depending on the plugin, you may have to adjust some settings. You can also find a list of WordPress Plugins to Improve Your Website in a previous post of mine.
Edit CSS and Editor are tabs that unless you are super techy or familiar with coding I would just stay away from. If you delete something that is not supposed to be deleted, or if you add something in that may not be correct you can make things go all wonky or totally break your website. You will be able to access your website through the back-end of your website – not your dashboard, I’m talking through your hosting/server sites and fix your mistake there. It’s a huge pain and it’s just not worth the stress of seeing a page pop up that says you are no longer able to access your website and that your site is down. Trust me, I have done it more times than I care to admit when I first started out. Luckily for me though, I was able to pull my hot hubby into the mix and he was able to fix it for me in no time flat.
Updates
This one is the most important section in my opinion. If you go up to the top left-hand side of your dashboard hover over Dashboard and you will see Updates. Inside you will find any and all items that require an update – from your WordPress, your theme or plugins. Be sure that you are checking this regularly (I suggest at least weekly) and be sure that you are completing the updates. By updating these items your site will run more smoothly, and it will be more secure. You may also notice at if an update is required you will see a number in an orange circle next to the Plugin option, or in the top menu item next to comments, adding a new post or page, etc.
Final Thoughts
The rest of your dashboard is fairly user-friendly and I totally recommend going in and poking around to see what each section is capable of. One of the best ways to learn is to actually do something. If I missed any major sections that you are confused about, or if there is anything that needs explaining please comment so that I can help you out any way that I can! In my next post, we will go over plugins so stay tuned!